<?xml version="1.0" encoding="utf-8"?><feed xmlns="http://www.w3.org/2005/Atom" ><generator uri="https://jekyllrb.com/" version="4.3.2">Jekyll</generator><link href="https://www.brantonboehm.com/feed.xml" rel="self" type="application/atom+xml" /><link href="https://www.brantonboehm.com/" rel="alternate" type="text/html" /><updated>2026-08-18T15:01:36+00:00</updated><id>https://www.brantonboehm.com/feed.xml</id><title type="html">Branton’s Blog</title><subtitle>Personal blog of hobbies and projects, including ultramarathons, trail running, golf, iOS development, and web development.</subtitle><author><name>Branton Boehm</name><email>blog@brantonboehm.com</email></author><entry><title type="html">Spring Energy Stole Two Years of Racing</title><link href="https://www.brantonboehm.com/run/spring-stole-two-years/" rel="alternate" type="text/html" title="Spring Energy Stole Two Years of Racing" /><published>2024-06-01T00:00:00+00:00</published><updated>2024-06-01T00:00:00+00:00</updated><id>https://www.brantonboehm.com/run/spring-stole-two-years</id><content type="html" xml:base="https://www.brantonboehm.com/run/spring-stole-two-years/"><![CDATA[<p>There’s <a href="https://www.runbaldwin.com/the-downfall-of-spring-energy-gels">some controversy happening in the endurance sports world right now</a>.
Spring Energy fraudulantly labeled their gels as having a much higher carbohydrate and caloric content than they actually did.
The worst offender was their Awesome Sauce gel, which boasted 45 grams of carbs when labs are showing it has 17 grams.</p>

<p>I started running trail ultras again in 2019.
I finished every race I started, building up from 50K to 100M.
At the 100M, I ate more frequently and more calories than ever before.
I remember telling people that the thought of dropping out never entered my mind, not even at 3am when I was falling asleep on my feet.</p>

<p>After that race, we decided that more carbs and calories were better.
As a result, in 2022 I switched to using Spring Energy, specifically Awesome Sauce, as my primary fuel.
On long training runs and in races, I would eat one hourly, and rotate other fuels on the half hours.
Here are my results from 2019 until now in all of the trail ultras I’ve started:</p>

<table>
  <thead>
    <tr>
      <th>Date</th>
      <th>Race</th>
      <th>Result</th>
      <th>Spring?</th>
      <th>Notes</th>
    </tr>
  </thead>
  <tbody>
    <tr>
      <td>3/30/2019</td>
      <td>Badger Mountain 55K</td>
      <td>Finish</td>
      <td>NO</td>
      <td> </td>
    </tr>
    <tr>
      <td>8/3/2019</td>
      <td>Volcanic 50K</td>
      <td>Finish</td>
      <td>NO</td>
      <td> </td>
    </tr>
    <tr>
      <td>8/31/2019</td>
      <td>Tuscazoar 50M</td>
      <td>Finish (Win!)</td>
      <td>NO</td>
      <td> </td>
    </tr>
    <tr>
      <td>10/5/2019</td>
      <td>Cuyamaca 100K</td>
      <td>Finish</td>
      <td>NO</td>
      <td> </td>
    </tr>
    <tr>
      <td>Summer 2020</td>
      <td>40M on 40th Birthday</td>
      <td>Finish</td>
      <td>NO</td>
      <td> </td>
    </tr>
    <tr>
      <td>3/27/2021</td>
      <td>Badger Mountain 55K</td>
      <td>Finish</td>
      <td>NO</td>
      <td> </td>
    </tr>
    <tr>
      <td>7/31/2021</td>
      <td>White River 50M</td>
      <td>Finish</td>
      <td>NO</td>
      <td> </td>
    </tr>
    <tr>
      <td>10/2/2021</td>
      <td>Secret Beach 100K</td>
      <td>Finish</td>
      <td>NO</td>
      <td> </td>
    </tr>
    <tr>
      <td>11/6/2021</td>
      <td>Rio Del Lago 100M</td>
      <td>Finish</td>
      <td>NO</td>
      <td> </td>
    </tr>
    <tr>
      <td>4/23/2022</td>
      <td>Canyons 100K</td>
      <td>DNF</td>
      <td>YES</td>
      <td>Dropped at 50K with no energy.</td>
    </tr>
    <tr>
      <td>6/11/2022</td>
      <td>Cool Moon 50M</td>
      <td>DNF</td>
      <td>YES</td>
      <td>Caught my toe on a rock, fell, and vomitted. Possible indirectly caused by under-fueling. Dropped at 50K.</td>
    </tr>
    <tr>
      <td>7/30/2022</td>
      <td>Burning River 100M</td>
      <td>DNF</td>
      <td>YES</td>
      <td>Had a solid first 50M. I wanted to drop at mile 67 but my crew got me back on the course. Struggled to mile 87, including sleeping for a bit, but dropped as I’d slowed to the point I wasn’t going to beat a cutoff. Cutoffs have never been an issue for me.</td>
    </tr>
    <tr>
      <td>2/18/2023</td>
      <td>FOURmidible 50K</td>
      <td>Finish</td>
      <td>YES</td>
      <td> </td>
    </tr>
    <tr>
      <td>6/10/2023</td>
      <td>Cool Moon 100M</td>
      <td>DNF</td>
      <td>YES</td>
      <td>Dropped at 50M after hours of stomach pains. It was probably just empty.</td>
    </tr>
  </tbody>
</table>

<p>To me, it’s pretty clear what happened here.
I went from a reliable finisher to not being able to find a finish line beyond 50K when I switched to Spring.
I thought I was hitting these high carbs and calories, because I trusted nutrition labels to be at least close to accurate.
In all of my inner reflection about why I couldn’t finish a race, questioning the labels never occurred to me.</p>

<p>Of course, I take some of the blame here.
This is one of those, “If it’s too good to be true, it probably is,” situations.
My training wasn’t great in 2022, so that was the obvious thing to focus on and fix.
I got a coach for 2023 to try to fix it, but I still couldn’t finish.</p>

<h2 id="2024-and-beyond">2024 and Beyond</h2>

<p>It’s time to get back to my pre-Spring finishing ways.
But I’m in a much better position now than I was in 2022.</p>

<p>Now I have a coach. We’re doing cycling to get “free fitness” on days I’m not running. We’re doing strength &amp; mobility to focus on my injury-prone areas. We’re doing hill repeats and speed workouts as opposed to only slow stuff. I’m more athletic than I was in 2022.</p>

<p>And I’m going to use those lab tests that people are getting on other nutrition products to make sure I’m actually fueling properly. My ceiling is so much higher than where I ended 2022.</p>

<p>I’m off for a run…</p>]]></content><author><name>Branton Boehm</name><email>blog@brantonboehm.com</email></author><category term="Run" /><summary type="html"><![CDATA[There’s some controversy happening in the endurance sports world right now. Spring Energy fraudulantly labeled their gels as having a much higher carbohydrate and caloric content than they actually did. The worst offender was their Awesome Sauce gel, which boasted 45 grams of carbs when labs are showing it has 17 grams.]]></summary></entry><entry><title type="html">SwiftUI’s Label Improves Accessibility</title><link href="https://www.brantonboehm.com/code/swiftui-label-improves-accessibility/" rel="alternate" type="text/html" title="SwiftUI’s Label Improves Accessibility" /><published>2023-12-26T00:00:00+00:00</published><updated>2023-12-26T00:00:00+00:00</updated><id>https://www.brantonboehm.com/code/swiftui-label-improves-accessibility</id><content type="html" xml:base="https://www.brantonboehm.com/code/swiftui-label-improves-accessibility/"><![CDATA[<p>What’s the difference between these two pieces of SwiftUI?</p>

<div class="language-swift highlighter-rouge"><div class="highlight"><pre class="highlight"><code><span class="kt">HStack</span> <span class="p">{</span>
    <span class="kt">Image</span><span class="p">(</span><span class="nv">systemName</span><span class="p">:</span> <span class="s">"globe"</span><span class="p">)</span>
    <span class="kt">Text</span><span class="p">(</span><span class="s">"Hello, world!"</span><span class="p">)</span>
<span class="p">}</span>

<span class="kt">Label</span><span class="p">(</span><span class="s">"Hello, world!"</span><span class="p">,</span> <span class="nv">systemImage</span><span class="p">:</span> <span class="s">"globe"</span><span class="p">)</span>
</code></pre></div></div>

<p>In addition to more concise and expressive, the <a href="https://developer.apple.com/documentation/swiftui/label"><code class="language-plaintext highlighter-rouge">Label</code></a> is also better for accessibility. It applies the <a href="https://developer.apple.com/documentation/swiftui/accessibilitychildbehavior/combine"><code class="language-plaintext highlighter-rouge">.accessibilityElement(children: .combine)</code> modifier</a> to group its subviews.</p>

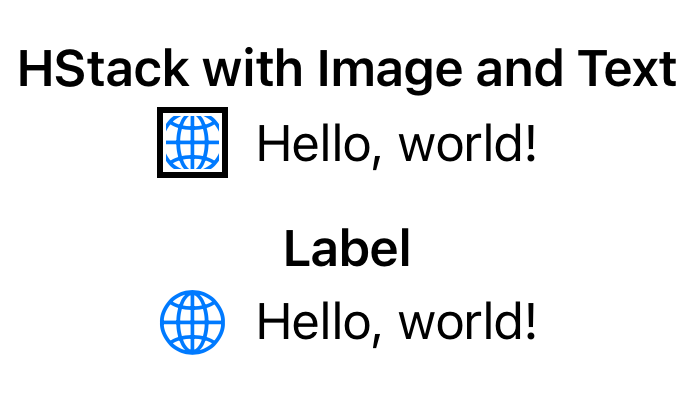
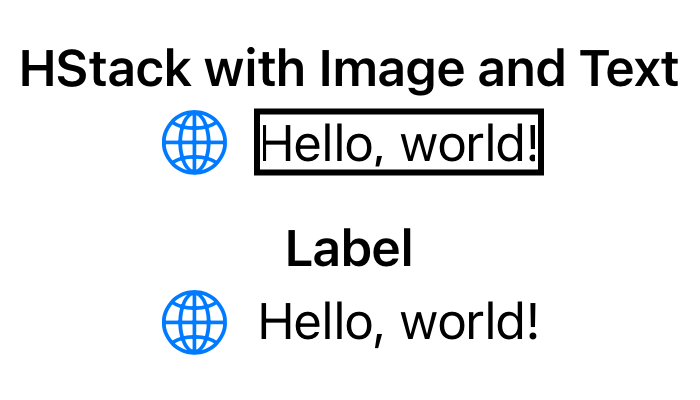
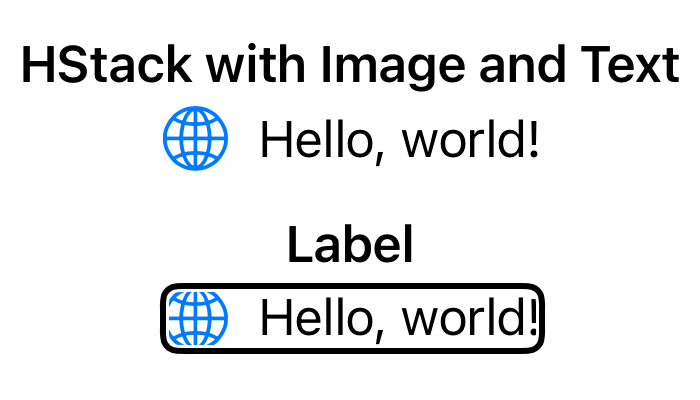
<p>This allows accessibility tools like VoiceOver and Switch Control to have larger, more semantic hit areas with more meaningful feedback. Here is what gets selected as you go through these subviews with VoiceOver:</p>

<table>
  <thead>
    <tr>
      <th style="text-align: center">View</th>
      <th style="text-align: center">Image</th>
      <th style="text-align: center">Text</th>
      <th style="text-align: center">Label</th>
    </tr>
  </thead>
  <tbody>
    <tr>
      <td style="text-align: center">Screenshot</td>
      <td style="text-align: center"><img src="/assets/images/label-accessibility-image.png" alt="SwiftUI Image Selected in VoiceOver" /></td>
      <td style="text-align: center"><img src="/assets/images/label-accessibility-text.png" alt="SwiftUI Text Selected in VoiceOver" /></td>
      <td style="text-align: center"><img src="/assets/images/label-accessibility-label.png" alt="SwiftUI Label Selected in VoiceOver" /></td>
    </tr>
    <tr>
      <td style="text-align: center">Accouncement</td>
      <td style="text-align: center">Globe, image. Globe.</td>
      <td style="text-align: center">Hello, world!</td>
      <td style="text-align: center">Hello, world!</td>
    </tr>
  </tbody>
</table>

<p>By using the <code class="language-plaintext highlighter-rouge">Label</code>, you’ve created a better accessibility UX. While you could use the <code class="language-plaintext highlighter-rouge">HStack</code> and the <code class="language-plaintext highlighter-rouge">.accessibilityElement(children: .combine)</code> modifier, using a <code class="language-plaintext highlighter-rouge">Label</code> is simpler and will get you platform native behavior when it’s time to use the code on different platforms, as well.</p>]]></content><author><name>Branton Boehm</name><email>blog@brantonboehm.com</email></author><category term="Code" /><category term="Accessibility" /><category term="VoiceOver" /><category term="SwiftUI" /><summary type="html"><![CDATA[What’s the difference between these two pieces of SwiftUI?]]></summary></entry><entry><title type="html">Using SwiftUI’s `.task` instead of `.onAppear`</title><link href="https://www.brantonboehm.com/code/swiftui-task-view-modifier-instead-of-onappear/" rel="alternate" type="text/html" title="Using SwiftUI’s `.task` instead of `.onAppear`" /><published>2023-09-09T00:00:00+00:00</published><updated>2023-09-09T00:00:00+00:00</updated><id>https://www.brantonboehm.com/code/swiftui-task-view-modifier-instead-of-onappear</id><content type="html" xml:base="https://www.brantonboehm.com/code/swiftui-task-view-modifier-instead-of-onappear/"><![CDATA[<p>As I’ve been learning SwiftUI, there are times that I’ve wanted to run some async code when a view appeared. The straightforward translation of that intent is to create a <code class="language-plaintext highlighter-rouge">Task</code> in the <a href="https://developer.apple.com/documentation/swiftui/view/onappear(perform:)"><code class="language-plaintext highlighter-rouge">.onAppear</code> view modifier</a>.</p>

<div class="language-swift highlighter-rouge"><div class="highlight"><pre class="highlight"><code><span class="c1">// Naive implementation -- probably not what you want to do</span>
<span class="k">var</span> <span class="nv">body</span><span class="p">:</span> <span class="kd">some</span> <span class="kt">View</span> <span class="p">{</span>
    <span class="kt">Text</span><span class="p">(</span><span class="s">"Awesome Sauce"</span><span class="p">)</span>
        <span class="o">.</span><span class="n">onAppear</span> <span class="p">{</span>
            <span class="kt">Task</span> <span class="p">{</span>
                <span class="c1">// Async task that is NOT cancelled when view disappears.</span>
            <span class="p">}</span>
        <span class="p">}</span>
<span class="p">}</span>
</code></pre></div></div>

<p>Each time the <code class="language-plaintext highlighter-rouge">View</code> appears, a new task will be created. If this is in a <code class="language-plaintext highlighter-rouge">NavigationStack</code> where views can be pushed and popped often, you may end up with many tasks running for the same view or doing background work for a view that no longer exists.</p>

<p>SwiftUI supports this common pattern with the <a href="https://developer.apple.com/documentation/swiftui/view/task(priority:_:)"><code class="language-plaintext highlighter-rouge">.task</code> view modifier</a>. The primary benefit of this over the naive approach is support for cancellation when the view disappears.</p>

<div class="language-swift highlighter-rouge"><div class="highlight"><pre class="highlight"><code><span class="c1">// Improved implementation -- supports task cancellation</span>
<span class="k">var</span> <span class="nv">body</span><span class="p">:</span> <span class="kd">some</span> <span class="kt">View</span> <span class="p">{</span>
    <span class="kt">Text</span><span class="p">(</span><span class="s">"Awesome Sauce"</span><span class="p">)</span>
        <span class="o">.</span><span class="n">task</span> <span class="p">{</span>
            <span class="c1">// Async task that is cancelled when the View disappears.</span>
        <span class="p">}</span>
<span class="p">}</span>
</code></pre></div></div>

<h2 id="supporting-task-cancellation">Supporting Task Cancellation</h2>

<p>Just because a task is cancelled doesn’t mean that it’s terminated. That would result in undefined behavior. Instead, it is up to the developer to check if a task is cancelled and handle it appropriately for the workload that’s behing performed. From <a href="https://docs.swift.org/swift-book/documentation/the-swift-programming-language/concurrency/#Task-Cancellation">the Swift documentation</a>:</p>

<blockquote>
  <p>Depending on the work you’re doing, that usually means one of the following:</p>
  <ul>
    <li>Throwing an error like CancellationError</li>
    <li>Returning nil or an empty collection</li>
    <li>Returning the partially completed work</li>
  </ul>
</blockquote>

<p>There are two primary ways of checking if the task has been cancelled:</p>

<ul>
  <li>Calling <a href="https://developer.apple.com/documentation/swift/task/checkcancellation()"><code class="language-plaintext highlighter-rouge">Task.checkCancellation()</code></a> will throw a <code class="language-plaintext highlighter-rouge">CancellationError</code> if the task has been cancelled.</li>
  <li>Checking <a href="https://developer.apple.com/documentation/swift/task/iscancelled-swift.type.property"><code class="language-plaintext highlighter-rouge">Task.isCancelled</code></a> and handling it appropriately.</li>
</ul>

<p>There are static and instance versions of these. If inside the task, use the static versions and it will report on the currently running task. If you have an instance of a task, use the instance version to check on that specific task’s status.</p>]]></content><author><name>Branton Boehm</name><email>blog@brantonboehm.com</email></author><category term="Code" /><category term="TIL" /><category term="SwiftUI" /><summary type="html"><![CDATA[As I’ve been learning SwiftUI, there are times that I’ve wanted to run some async code when a view appeared. The straightforward translation of that intent is to create a Task in the .onAppear view modifier.]]></summary></entry><entry><title type="html">SwiftUI ToolbarItem with .status placement doesn’t appear</title><link href="https://www.brantonboehm.com/code/swiftui-toolbar-item-not-appearing-in-status-placement/" rel="alternate" type="text/html" title="SwiftUI ToolbarItem with .status placement doesn’t appear" /><published>2023-09-08T00:00:00+00:00</published><updated>2023-09-08T00:00:00+00:00</updated><id>https://www.brantonboehm.com/code/swiftui-toolbar-item-not-appearing-in-status-placement</id><content type="html" xml:base="https://www.brantonboehm.com/code/swiftui-toolbar-item-not-appearing-in-status-placement/"><![CDATA[<p>I recently was trying to add a <code class="language-plaintext highlighter-rouge">ToolbarItem</code> to the <code class="language-plaintext highlighter-rouge">.bottomBar</code> or <code class="language-plaintext highlighter-rouge">.status</code> <a href="https://developer.apple.com/documentation/swiftui/toolbaritemplacement"><code class="language-plaintext highlighter-rouge">ToolbarItemPlacement</code></a> and it would not appear. It appears to have been a bug in <code class="language-plaintext highlighter-rouge">NavigationView</code>. I was showing a <code class="language-plaintext highlighter-rouge">ProgressView</code> during an async API call. The bottom bar would appear and disappear as the request started and completed, but the <code class="language-plaintext highlighter-rouge">ProgressView</code> (or any other view I tried) was nowhere to be seen. From the view debugger, it didn’t appear to exist at all.</p>

<p>When I changed from a <code class="language-plaintext highlighter-rouge">NavigationView</code> to a <code class="language-plaintext highlighter-rouge">NavigationStack</code>, it started working. A good reminder to follow the guide to <a href="https://developer.apple.com/documentation/swiftui/migrating-to-new-navigation-types">migrate to new navigation types</a>. As with most things Apple does, move quickly with the direction they’re heading and your life will be easier.</p>]]></content><author><name>Branton Boehm</name><email>blog@brantonboehm.com</email></author><category term="Code" /><category term="SwiftUI" /><summary type="html"><![CDATA[I recently was trying to add a ToolbarItem to the .bottomBar or .status ToolbarItemPlacement and it would not appear. It appears to have been a bug in NavigationView. I was showing a ProgressView during an async API call. The bottom bar would appear and disappear as the request started and completed, but the ProgressView (or any other view I tried) was nowhere to be seen. From the view debugger, it didn’t appear to exist at all.]]></summary></entry><entry><title type="html">macOS Shortcuts: Reading a text file without a .txt extension</title><link href="https://www.brantonboehm.com/code/macos-shortcuts-read-text-file-without-txt-extension/" rel="alternate" type="text/html" title="macOS Shortcuts: Reading a text file without a .txt extension" /><published>2023-09-03T00:00:00+00:00</published><updated>2023-09-03T00:00:00+00:00</updated><id>https://www.brantonboehm.com/code/macos-shortcuts-read-text-file-without-txt-extension</id><content type="html" xml:base="https://www.brantonboehm.com/code/macos-shortcuts-read-text-file-without-txt-extension/"><![CDATA[<p>Today I set out to build some time tracking <a href="https://support.apple.com/guide/shortcuts-mac/intro-to-shortcuts-apdf22b0444c/mac">Shortcuts on macOS</a>. I’m using <a href="https://ledger-cli.org/doc/ledger3.html#Time-Keeping">Ledger’s time keeping capabilities</a> and I wanted to read the last line of my data file.</p>

<p>I ended up wasting a bunch of time because I named the file <code class="language-plaintext highlighter-rouge">time.dat</code>. I tried the following set of actions and it kept returning the text <code class="language-plaintext highlighter-rouge">time</code>:</p>

<ol>
  <li>File - I set the correct path to <code class="language-plaintext highlighter-rouge">time.dat</code></li>
  <li>Split Text by New Lines</li>
  <li>Get Last Item from Split Text</li>
</ol>

<p>This should have returned the last line from the file, but I kept getting <code class="language-plaintext highlighter-rouge">time</code>. Finally, I stumbled upon <a href="https://www.reddit.com/r/shortcuts/comments/t0x73i/reading_a_text_file_with_an_unconventional/">this Reddit post</a> that had the key: <strong>the file must have a <code class="language-plaintext highlighter-rouge">.txt</code> extension</strong>.</p>

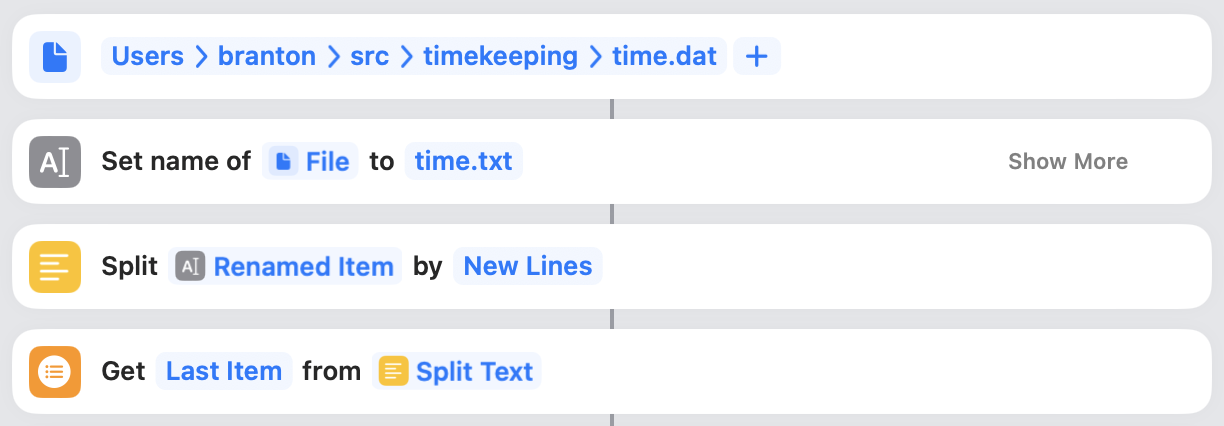
<p>I didn’t want to rename the actual file on disk, but the post says you can use the “Set Name” action to rename it within the Shortcut. Now my Shortcut has these actions and it works like a charm:</p>

<ol>
  <li>File - I set the correct path to <code class="language-plaintext highlighter-rouge">time.dat</code></li>
  <li>Set name of File to <code class="language-plaintext highlighter-rouge">time.txt</code></li>
  <li>Split Text by New Lines</li>
  <li>Get Last Item from Split Text</li>
</ol>

<p><img src="/assets/images/shortcuts-read-text-file.png" alt="Shortcut to read a text file without a .txt extension" class="align-center" /></p>

<p>I’m writing this up in hopes of saving someone else from wasting as much time as I did, most likely my future self.</p>]]></content><author><name>Branton Boehm</name><email>blog@brantonboehm.com</email></author><category term="Code" /><category term="TIL" /><category term="dev-tools" /><category term="shortcuts" /><category term="macOS" /><summary type="html"><![CDATA[Today I set out to build some time tracking Shortcuts on macOS. I’m using Ledger’s time keeping capabilities and I wanted to read the last line of my data file.]]></summary></entry><entry><title type="html">Conditional Git Configuration</title><link href="https://www.brantonboehm.com/code/conditional-git-config/" rel="alternate" type="text/html" title="Conditional Git Configuration" /><published>2023-08-31T00:00:00+00:00</published><updated>2023-08-31T00:00:00+00:00</updated><id>https://www.brantonboehm.com/code/conditional-git-config</id><content type="html" xml:base="https://www.brantonboehm.com/code/conditional-git-config/"><![CDATA[<p>I’m about to start a new job that uses GitHub. I’ll be using my existing GitHub account but with a work email for any repositories in the work organization. To avoid acccidentally pushing commits with my personal email to a work repository, I’ve updated my <code class="language-plaintext highlighter-rouge">git</code> configuration with a <a href="https://git-scm.com/docs/git-config#_conditional_includes">conditional include</a>. These can use the path to the <code class="language-plaintext highlighter-rouge">.git/</code> directory, the branch, or the remote to include another config file.</p>

<p>I’ll be using <a href="https://en.wikipedia.org/wiki/.example"><code class="language-plaintext highlighter-rouge">.example</code> domains</a> throughout to avoid referencing any real emails or GitHub resources.</p>

<div class="language-plaintext highlighter-rouge"><div class="highlight"><pre class="highlight"><code># ~/.config/git/config
[user]
    name = Branton Boehm
    email = branton@personal.example

[includeIf "hasconfig:remote.*.url:git@github.example:Work/**"]
    path = config-work
</code></pre></div></div>

<div class="language-plaintext highlighter-rouge"><div class="highlight"><pre class="highlight"><code># ~/.config/git/config-work
[user]
    email = branton@work.example
</code></pre></div></div>

<p>I can verify this is working by checking the email from within a <code class="language-plaintext highlighter-rouge">git</code> clone:</p>

<div class="language-sh highlighter-rouge"><div class="highlight"><pre class="highlight"><code>~/src/website <span class="nv">$ </span>git remote <span class="nt">-v</span>
origin  git@github.example:branton/website.git <span class="o">(</span>fetch<span class="o">)</span>
origin  git@github.example:branton/website.git <span class="o">(</span>push<span class="o">)</span>

~/src/website <span class="nv">$ </span>git config <span class="nt">--get</span> user.email
branton@personal.example

~/src/api <span class="nv">$ </span>git remote <span class="nt">-v</span>
origin  git@github.example:Work/api.git <span class="o">(</span>fetch<span class="o">)</span>
origin  git@github.example:Work/api.git <span class="o">(</span>push<span class="o">)</span>

~/src/api <span class="nv">$ </span>git config <span class="nt">--get</span> user.email
branton@work.example
</code></pre></div></div>

<p>If this isn’t working as expected, the <code class="language-plaintext highlighter-rouge">git config --list --show-origin</code> command will display the config file each setting is coming from.</p>]]></content><author><name>Branton Boehm</name><email>blog@brantonboehm.com</email></author><category term="Code" /><category term="TIL" /><category term="dev-tools" /><category term="git" /><summary type="html"><![CDATA[I’m about to start a new job that uses GitHub. I’ll be using my existing GitHub account but with a work email for any repositories in the work organization. To avoid acccidentally pushing commits with my personal email to a work repository, I’ve updated my git configuration with a conditional include. These can use the path to the .git/ directory, the branch, or the remote to include another config file.]]></summary></entry><entry><title type="html">iPad’s Hardware Escape Key</title><link href="https://www.brantonboehm.com/code/ipad-hardware-escape-key/" rel="alternate" type="text/html" title="iPad’s Hardware Escape Key" /><published>2020-05-25T00:00:00+00:00</published><updated>2020-05-25T00:00:00+00:00</updated><id>https://www.brantonboehm.com/code/ipad-hardware-escape-key</id><content type="html" xml:base="https://www.brantonboehm.com/code/ipad-hardware-escape-key/"><![CDATA[<p>I build this website from my iPad Pro using the <a href="https://blink.sh">Blink shell</a> to <code class="language-plaintext highlighter-rouge">mosh</code> into a Raspberry Pi. My primary tools there are <code class="language-plaintext highlighter-rouge">vim</code>, <code class="language-plaintext highlighter-rouge">tmux</code>, and <code class="language-plaintext highlighter-rouge">jekyll</code>. The lack of a hardware Escape key on the Smart Keyboard Folio used to be a problem. But with iPadOS, no more!</p>

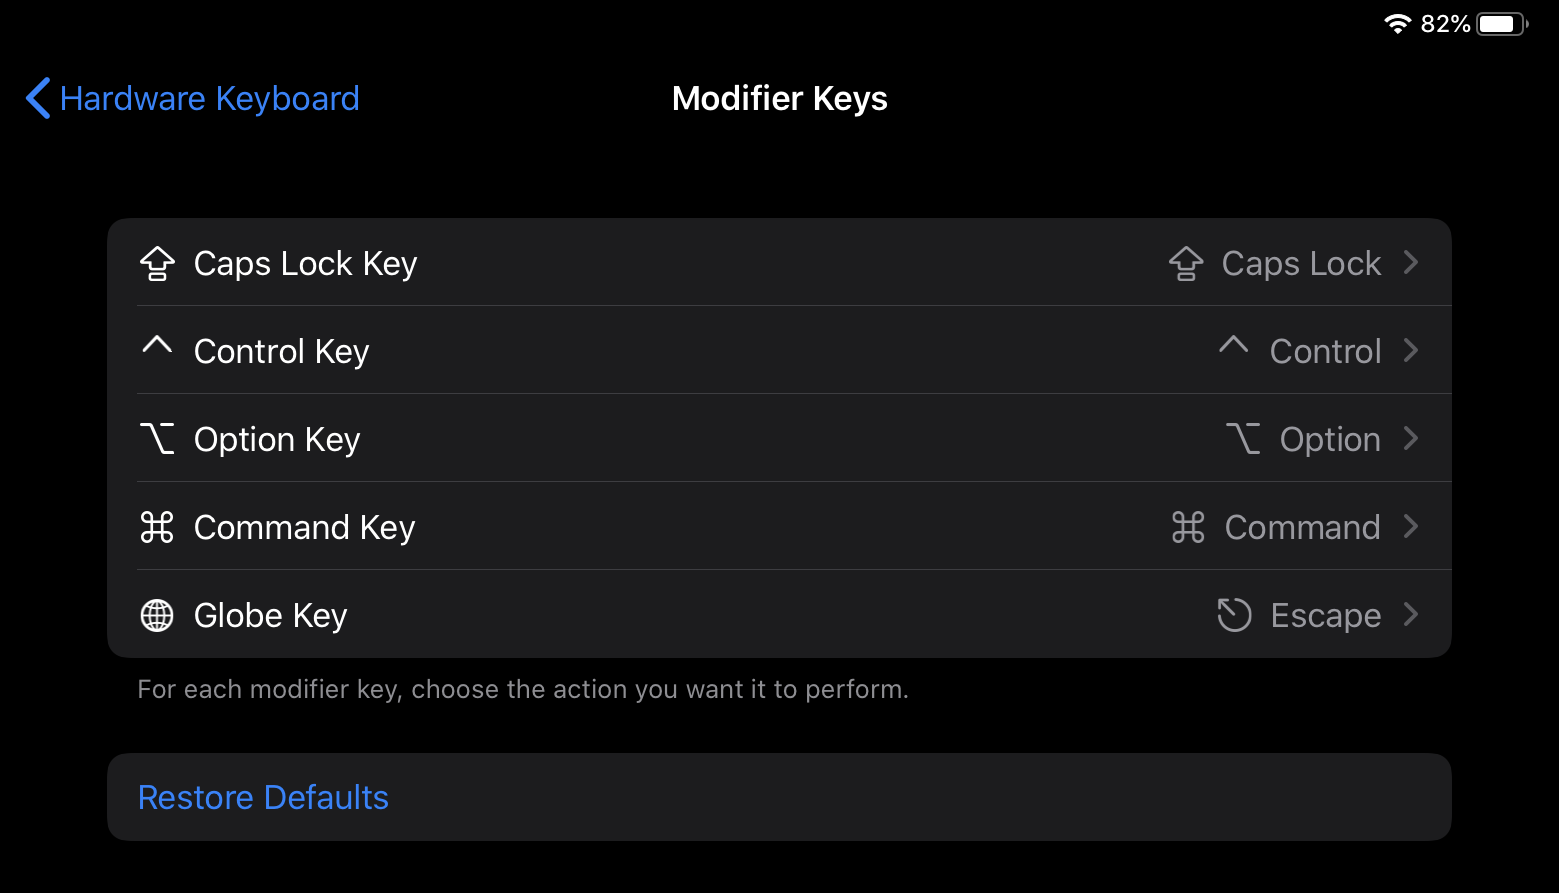
<p><img src="/assets/images/ipad-hardware-keyboard-modifier-keys.png" alt="Remapping modifier keys in iPadOS" /></p>

<p>Similarly to macOS, you can now remap modifier keys on hardware keyboards in iPadOS. Find it in Settings &gt; General &gt; Keyboard &gt; Hardware Keyboard &gt; Modifier Keys.</p>

<p>I found that I rarely had a good use for the Globe key, so that’s what I’ve remapped to Escape. If you do this, you can still cycle through your keyboards (including emojis) by using Control+Space.</p>

<p class="notice--info">Remappings are on a per-hardware keyboard basis. I use both the <a href="https://www.apple.com/ipad-keyboards/">Smart Keyboard Folio</a> and also the <a href="https://kinesis-ergo.com/keyboards/advantage2-keyboard/">Kinesis Advantage2</a>. iPadOS keeps remappings separate between them.</p>

<h2 id="escape-works-in-more-than-vim">Escape Works in More than Vim</h2>

<p>If you’re used to using Escape in macOS, it “just works” in a lot of places in iPadOS, too. For example, if a dialog has a Cancel button then pressing Escape will dismiss it. It’s one more reason to, as an iOS/iPadOS developer, use native controls instead of building custom UI. Supporting the Escape key is unlikely to be a high priority for your product manager, so you can sneak it in by using native controls. Nobody is going to complain that they got better keyboard functionality for free!</p>

<h2 id="escape-in-blink-before-ipados">Escape in Blink Before iPadOS</h2>

<p>Blink itself has a solution for the lack of an Escape key. It allows you to remap keys and I had remapped Caps Lock. It was done in software locally within Blink, so when switching to another app, TEXT ALWAYS STARTED IN ALL CAPS. I got used to it, but it wasn’t ideal.</p>

<p>Looking back at Blink’s settings now, there were probably better options available to me. I rarely use the right Option key, for example, but it’s also uncomfortable to hit. Remapping the Globe key works far better for me.</p>]]></content><author><name>Branton Boehm</name><email>blog@brantonboehm.com</email></author><category term="Code" /><category term="TIL" /><category term="iPadOS" /><category term="keyboard" /><summary type="html"><![CDATA[I build this website from my iPad Pro using the Blink shell to mosh into a Raspberry Pi. My primary tools there are vim, tmux, and jekyll. The lack of a hardware Escape key on the Smart Keyboard Folio used to be a problem. But with iPadOS, no more!]]></summary></entry><entry><title type="html">Per-Directory Environment Variables with direnv</title><link href="https://www.brantonboehm.com/code/directory-specific-environment-variables-with-direnv/" rel="alternate" type="text/html" title="Per-Directory Environment Variables with direnv" /><published>2020-05-18T00:00:00+00:00</published><updated>2020-05-18T00:00:00+00:00</updated><id>https://www.brantonboehm.com/code/directory-specific-environment-variables-with-direnv</id><content type="html" xml:base="https://www.brantonboehm.com/code/directory-specific-environment-variables-with-direnv/"><![CDATA[<p>While tinkering with <a href="https://www.ledger-cli.org">ledger</a>, it was a pain to constantly specify the input file. The app supports a <code class="language-plaintext highlighter-rouge">LEDGER_FILE</code> environment variable, but it didn’t make sense to specify that in my user profile’s dotfiles. Enter <a href="https://direnv.net">direnv</a>:</p>

<blockquote>
  <p><code class="language-plaintext highlighter-rouge">direnv</code> is an extension for your shell. It augments existing shells with a new feature that can load and unload environment variables depending on the current directory.</p>
</blockquote>

<p>In my specific scenario, I have the following <code class="language-plaintext highlighter-rouge">.envrc</code> file in the working directory for my <code class="language-plaintext highlighter-rouge">ledger</code> project:</p>

<div class="language-sh highlighter-rouge"><div class="highlight"><pre class="highlight"><code><span class="c"># .envrc</span>
<span class="nb">export </span><span class="nv">LEDGER_FILE</span><span class="o">=</span>transactions.dat
<span class="nb">export </span><span class="nv">LEDGER_DATE_FORMAT</span><span class="o">=</span>%Y/%m/%d
</code></pre></div></div>

<p>When I <code class="language-plaintext highlighter-rouge">cd</code> into the directory, <code class="language-plaintext highlighter-rouge">direnv</code> loads the file:</p>

<div class="language-sh highlighter-rouge"><div class="highlight"><pre class="highlight"><code><span class="nv">$ </span><span class="nb">cd </span>finances
direnv: loading .envrc
direnv: <span class="nb">export</span> +LEDGER_DATE_FORMAT +LEDGER_FILE
<span class="nv">$ </span><span class="nb">echo</span> <span class="nv">$LEDGER_FILE</span>
transactions.dat
</code></pre></div></div>

<p>And when I <code class="language-plaintext highlighter-rouge">cd</code> back out of the directory, <code class="language-plaintext highlighter-rouge">direnv</code> unloads:</p>

<div class="language-sh highlighter-rouge"><div class="highlight"><pre class="highlight"><code><span class="nv">$ </span><span class="nb">cd</span> ..
direnv: unloading
<span class="nv">$ </span><span class="nb">echo</span> <span class="nv">$LEDGER_FILE</span>

</code></pre></div></div>

<p>This allows me to keep project-specific configuration committed to the same git repository as the project itself. It’s <a href="https://direnv.net/docs/installation.html">available to install</a> in most Unix-like distributions. I have it in my <code class="language-plaintext highlighter-rouge">Brewfile</code> for macOS and <code class="language-plaintext highlighter-rouge">bootstrap.sh</code> for Raspbian, and have added <code class="language-plaintext highlighter-rouge">eval "$(direnv hook zsh)"</code> to my <code class="language-plaintext highlighter-rouge">.zsh_profile</code>.</p>]]></content><author><name>Branton Boehm</name><email>blog@brantonboehm.com</email></author><category term="Code" /><category term="TIL" /><category term="dev-tools" /><summary type="html"><![CDATA[While tinkering with ledger, it was a pain to constantly specify the input file. The app supports a LEDGER_FILE environment variable, but it didn’t make sense to specify that in my user profile’s dotfiles. Enter direnv:]]></summary></entry><entry><title type="html">Group Apps in the macOS Dock</title><link href="https://www.brantonboehm.com/code/macos-grouped-dock/" rel="alternate" type="text/html" title="Group Apps in the macOS Dock" /><published>2020-04-27T00:00:00+00:00</published><updated>2020-04-27T00:00:00+00:00</updated><id>https://www.brantonboehm.com/code/macos-grouped-dock</id><content type="html" xml:base="https://www.brantonboehm.com/code/macos-grouped-dock/"><![CDATA[<p>I recently found a post on /r/macOS that showed <a href="https://www.reddit.com/r/MacOS/comments/fx5or3/what_do_you_think_of_this_setup_i_ll_detail_how_i/">groups of apps in the dock</a>.</p>

<p><img src="/assets/images/macos-grouped-dock.png" alt="Grouped macOS Dock" class="align-center" /></p>

<p>It’s done by writing to the user defaults store from the Terminal:</p>

<div class="language-sh highlighter-rouge"><div class="highlight"><pre class="highlight"><code><span class="nv">$ </span>defaults write com.apple.dock persistent-apps <span class="nt">-array-add</span> <span class="s1">'{"tile-type"="small-spacer-tile";}'</span>
<span class="nv">$ </span>killall Dock
</code></pre></div></div>

<p>This will add a small spacer to the end of the main section of your dock, which can then be dragged to wherever you’d like it. Add as many as you need to create your groups. To remove one, drag it out of the dock and release. A larger <code class="language-plaintext highlighter-rouge">spacer-tile</code> is also avaiable if you prefer.</p>]]></content><author><name>Branton Boehm</name><email>blog@brantonboehm.com</email></author><category term="Code" /><category term="TIL" /><category term="macOS" /><summary type="html"><![CDATA[I recently found a post on /r/macOS that showed groups of apps in the dock.]]></summary></entry><entry><title type="html">January 2020 Training Recap</title><link href="https://www.brantonboehm.com/run/january-2020-training-recap/" rel="alternate" type="text/html" title="January 2020 Training Recap" /><published>2020-02-02T00:00:00+00:00</published><updated>2020-02-02T00:00:00+00:00</updated><id>https://www.brantonboehm.com/run/january-2020-training-recap</id><content type="html" xml:base="https://www.brantonboehm.com/run/january-2020-training-recap/"><![CDATA[<p>The year is off to a great start! As I wait for the 100 miler lotteries to play out, I’m doing a fourteen week training block for the <a href="http://www.badgermountainchallenge.com/p/50k.html" data-proofer-ignore="">Badger Mountain 55K</a>. It started in the last full week of December, provides focus for my winter training, and will give me a fitness check compared to <a href="/run/badger-mountain-2019/">last year’s performance</a>.</p>

<p>Here on the site, I finally posted <a href="/run/tuscazoar-50-2019/">my race recap from winning the innagural Tuscazoar 50 miler</a> last August. I also <a href="/run/training/2019.html">archived last year’s training</a> and created some <a href="/run/training/charts.html">training charts</a> to compare data from each year.</p>

<p>This is the first of what I hope to be monthly updates, especially since I plan on racing less often this year. Not a whole lot of interesting stuff this month. The biggest takeaway was that I got a consistent month of winter training in, putting me way ahead of where I was last year at this time.</p>

<h2 id="tempo-runs">Tempo Runs</h2>

<p>In week 5 of the training plan, speedwork is introduced on Thursdays. I’m going to stick to tempo runs in this training block and add in long hill repeats in my primary training block.</p>

<p>The first tempo run, I didn’t know what to expect. I knew I was running faster than this time last year, but I’ve also been sticking to pavement whereas last year I was trying to get onto trails as much as possible. After a post-work nap, I headed out. I did a 20 minute warmup, an 18 minute tempo run, and then cooled down for the rest of the 7 miles. I was very happy with the pace, averaging 6:25/mile with my last rolling mile at 6:05.</p>

<p>A week later, I had the same workout and took the same post-work nap. This time, I covered a bit more ground and averaged 6:19/mile. (My initial math was wrong and I thought I averaged 6:05/mile… nope.)</p>

<p>It’s a lot of fun pushing the pace like this. It’s sparking some imagination, too. I’m wondering what I could do <a href="https://www.cob.org/services/recreation/activities/Pages/all-comer-track.aspx">in a 5K on the track this summer</a>.</p>

<h2 id="friday-run">Friday Run</h2>

<p>The training plans I use are from <em><a href="https://www.irunfar.com/rfp">Relentless Forward Progress: A guide to Running Ultramarathons</a></em>. They are 5 days/week, with Mondays and Fridays as rest days. This year, I was planning on adding recovery runs on Fridays in my primary training block. My legs have been feeling great, so I decided to introduce them earlier and got my first one in on the last day of the month.</p>

<p>It was my 23rd run of the month, topping my best months from last year with 22 runs in them. I just ran up to the local park and ran around the soccer field for a while, not worried about pace or distance.</p>

<p>Ideally, I’ll build up to ~5 miles during my primary training block, but I’ll play it by ear and do what feels best for my legs.</p>]]></content><author><name>Branton Boehm</name><email>blog@brantonboehm.com</email></author><category term="Run" /><category term="Training Recap" /><summary type="html"><![CDATA[The year is off to a great start! As I wait for the 100 miler lotteries to play out, I’m doing a fourteen week training block for the Badger Mountain 55K. It started in the last full week of December, provides focus for my winter training, and will give me a fitness check compared to last year’s performance.]]></summary></entry></feed>